Monday, August 5, 2013

New Toilet for Tushy

How does one “wear out” a toilet? Maybe Wear-Out is not the right choice of words. More like “fit better”?  I Dunno, butt….

History

Our 1999 King of the Road Crown Marquis came with a Thetford Aqua IMG_20130612_173409Magic Aurora.. yeah, that one.  It has been a good toilet but has never really sealed quite right.  The sliding door mechanism of the bowl has always been a bit cantankerous often sticking partially open or not quite closing water tight.  Sometimes it has been a real stinker about it.
I have replaced the seals a couple of times. I also replaced the water inlet valve when it started leaking around the valve stem.  Several times I have had it on the workbench and completely apart trying to make it work cleanly and make a tight seal.  Plumbers silicone grease on the sliding door and gaskets has helped but it made operations a bit stiff for awhile. 
CRC Heavy Duty Silicone spray has also helped a lot for shorter periods but the whole mechanism has just plain worn out.
A big factor has been mineral buildup on the mating surfaces of the door and seals. It gets rough and crusty, preventing a tight seal and over time this destroys the seals. The costs of replacing all the parts necessary to restore full reliability would be about those of a new toilet
I also have wanted an RV toilet with a truly elongated bowl and seat for more comfort and convenience.  A slight increase in height would be nice, too.
So for some time we have been looking for the right replacement toilet.  Although I eventually ended up buying the replacement online, shopping for what would work took a lot of hands on measurements with a tape measure and test sitting in Camping World and other RV shops.  Above all else I wanted the replacement to just always work as well as being fanny friendly.

The Solution

I decided on a Sealand (Dometic) Revolution 320 Gravity Discharge as the best compromise I could find for my requirements and price.  It is a high profile (although some call it a standard height) toilet. I got it in Bone rather than white and it has a very simple ball-curved bowl door that just plain works.

The good news is that I got it with free shipping at a very discounted price.  The less-good news is that the one that came was defective, ugh!

A Glitch

Unlike most RV toilets, the mating of the ceramic bowl to the plastic pedestal is done at the factory and is not field serviceable so if any leak ever develops between them, it is a guaranteed toilet replacement.  Well, after about 2 weeks use, this one started leaking on one side. During the installation I had noticed a slight amount of movement between the bowl and the pedestal on that side. It turns out that one of the retaining toggles stripped during tightening and never got tightened enough at the factory.
I contacted Dometic and they sent me to Sealand support which handles all of their brand toilet issues.  I was  pleasantly surprised when they asked about 3 questions and then wanted my address to send out a replacement – 2 day shipping.
She said that I must destroy the old toilet and dispose of it locally after removing all of the field replaceable parts, like the water valve, hand sprayer and toilet seat.
As promised, the replacement came in about a day and a half (business time but this was on a Friday) and I quickly put it in place. I stripped the parts from the original 320 and put them in my RV spare parts bin in the shed.
That was a few months ago and we are still loving this Dometic 320.  I opted for it over the slightly cheaper 310 because of the longer bowl option.  This one came with a hand sprayer included which is something that we had never had before but thought it would make some cleaning chores easier.  it does!
I will say that the gushing flush of the Aquamagic Aurora was more satisfying than this almost dribbling flush of the 320. But a short prefill done before a serious flush puts a bit more water in the bowl and gives a totally satisfactory flush.  The hand sprayer can quickly double the amount of water filling the bowl on a preflush fill for a better overall wash down.

Installation

Now that this history is out of the way, I will talk about the actual installation process a bit.
The Dometic (Sealand) 320 is pretty much a direct replacement for the Thetford Aquamagic Aurora. Specs for the mounting position and waste pipe are the same so it did just bolt in place.  However, the water inlet was a bit different and took some modifications before it would mate up to the new toilet.
First off, I have long wanted to have a behind the toilet shutoff for the freshwater supply to it. There have been times, such as when cleaning and lubricating the seals that the water needed to be off while the toilet bowl valve was wide open.  Also, if a leak did develop while out in the boonies, a way to shut off all water to the toilet without impacting the rest of the RV plumbing would be really helpful.  I had this scenario happen when the water valve on the Aquamagic started failing. It was a real pain to have to keep running outside to shut off the water supply between flushes and no one could even wash their hands.
SharkBite 1/2 in x 3/8 in. PEX Chrome Plated Angle-Stop
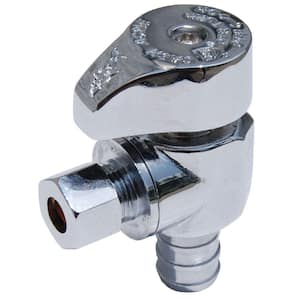
I chose a short valve with a quarter turn shutoff to insert into the water line just above the floor. Due to the higher and slightly off center inlet fitting on the toilet I added a short supply line to mate them together.
The result turned out to be a lot of work but was definitely worth it when the bowl started leaking a few weeks later. We could keep the bowl empty of standing water until time came to flush, fill it, flush it and then shut off the water and empty the bowl dry.
Next, I had to mate the valve to the toilet inlet and compensate for the offset in the process.
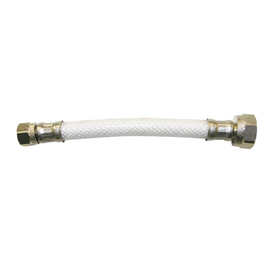
  Watts 3/8-in Compression 12-in PVC Faucet Supply LineI used a

Watts 3/8-in Compression 12-in PVC Faucet Supply Line

to do this by creating a loop from the inlet valve to the toilet. This allows for a change of height and offset as well as providing a slight damper for the rather abrupt shutoff of the toilet filling valve.
Here is the problem: Photo
and here is the solution: Photo
Not an inelegant solution and really not visible unless one is looking for it.IMG_20130805_082208
The RV runs and the toilet doesn’t.  We are happy campers.
ttfn
Budd

Friday, September 2, 2011

Windshield Wipers died

Hurricane Irene was dumping massive water on us on Saturday morning and the wind predictions were too close to call as far as how safe we were in the present location behind the house.

Old standing trees tend to hold a lot of water and it does not take much wind to start bringing parts of them down so we decided to move the rig to an open parking lot nearby with some buildings to shield us from the worst of the winds and with no trees to fall or drop parts on us.

Just as I was pulling the whole rig out of the driveway in the rain to relocate it the wipers stopped, pointing skyward and a raucous stripped gear sound erupted from the firewall.

Yep, wiper motor stripped its gears and no wipers. In this limited condition I settled on just getting it a few blocks to a different open parking lot and leaving it there until the wind threat was over.

Unfortunately, it was Saturday and no Truck dealers were open that might carry the part so repair had to wait until Monday morning.

On Sunday, in nice weather, Emery, III jumped in to help me get the old motor out and on Monday, helped install the new one.

On my 2000 Volvo 770, we just had to take off the nut on the drive shaft that holds the wiper arm link to the splined wiper motor shaft and then drive the arm off of that shaft.

Once the arm was clear of the wiper motor drive shaft, It was just a matter of removing 3 short 10mm bolts that held the motor to the bracket.  The new motor came with new mounting bolts and a new self locking nut to hold the wiper arm link onto the wiper motor drive shaft.

The hardest part about R/R this wiper motor was getting my 300 lbs into the right position with the right bracing to loosen and tighten the 3 bolts and the retaining drive shaft nut.  The rest was easy.

The replacement motor is a Sprague and came with a pigtail to plug in the wiper control electrical cable. The original motor had the electrical socket mounted directly to the motor assembly. No big deal.

With the right tools (10 mm open end, 10 mm socket, 1/2” open end wrench and a medium shaft Phillips screwdriver to stick into the hole in the bracket to block the wiper connecting rod from rotating while removing / replacing the nut that held it onto the drive shaft, it would be a 15 minute job to R/R once you had the replacement motor in hand.


ttfn

Budd

Thursday, June 23, 2011

Clifford's Throttle Position Sensor - Fixed

The problems I had with no Jake brake coming down from the mountains of West Virginia were due to a failing throttle position sensor (TPS).  It is like a noisy volume control on older audio equipment but since it is a sealed unit, there is no way to clean the contacts.

A couple of years ago, I removed it, worked the control through its entire range a bunch of times and basically, extended its life hoping to find a cheaper solution than the $170 replacement parts. It has worked ok since then but when I have checked the diagnostic faults log, there have been a growing number of inactive TPS faults indicating that it was getting much worse.

The TPS parts I picked up at Central Carolina Trucks in Kernersville, NC Just off of I-85/ I-40 was just a freightliner TPS and a six inch 3 wire- to-5 wire converter harness.  It took all of 15 minutes to replace it and not the estimated 2 hours shown in the parts catalog.  Easy job and now, no more TPS codes in my fault log..... and my Jake brake should work reliably from now on.
ttfn
Budd

The other shoe finally dropped

Several years ago the kitchen slideout started making a terrible rackety-clankity noise when going in or out.  At the time, I was sure the whole slide was going to end up in the street but it turned out to be a small problem that was very difficult to fix.

My mechanical slides are driven by a 12v dc motor through a gear train to a pinwheel shaft with teeth that engage cogs on the two rams.  To keep the whole thing from drifting while traveling or even when parked and extended, there is a permanent magnet and friction disk attached to the back end of the motor's drive shaft.  Very simple arrangement. This brake is wound with an electromagnet winding that activates with the motor to cancel the magnetic field of the permanent magnet so the motor shaft can turn freely.  When power to the motor stops, the electromagnet drops the cancelling magnetic field and the permanent magnet once again, clamps down on the friction disk attached to the end of the motor's drive shaft.

Unfortunately, the manufacturer used a pot metal cast adapter to fasten the brake assembly to the back of the motor. They also used only two #6 screws to fasten the adapter to the motor housing and did not use any Loctite. You guessed it.  The screws worked loose until one fell out and the whole brake unit was flopping around on the end of the motor shaft.  Lots of racket.

When I repaired the one under the kitchen slide it was some what accessible if you are small and skinny. I am 6'2 and 300 lbs. so you can imagine what a hard job this was to get finished.  They covered the heads of the attachment screws behind the brake mechanism so that had to be removed from the adapter before the adapter could be fastened back to the motor.

If you are a mechanic I know you hate engineers that do this kind of stuff.  In this case, it was hard to reach up into the belly of the RV between the axles to put the screws back in (with Loctite) but it was doable.

Guess what?  I have two slideout with this mechanism and the other one has now lost a screw and produces the terrible rackety-clankity noise when going in or out. Knowing what was wrong and how much work it was going to be to fix it I have not rushed right in to do it.

Today, I rushed in (where angels fear to tread, of course) and opened up the belly of the beast to tighten the adapter bracket back up.

Whoa! I said to myself when I had finally gotten at the motor assembly. The screws are loose but the adapter is BROKEN!  different game altogether.  Now I have to find a replacement or engineer something myself that will hold the brake assembly onto the motor housing.  Making it much worse is that there is no way to get at the screws that hold the brake to the adapter so to fix this puppy I am going to have to take the whole motor and gear box out just to tighten two #6 screws (assuming I can even find a replacement for the pot metal adapter).

So, until I can get on with it I just have to button the bottom back up to keep the critters out... but I was too pooped to do it today.... maybe tomorrow, I need to replace some of the insulation, anyway. It looks like it has been pulled out before, and just chunks stuffed back in there.  I will cut some batts to fit so it won't all come tumbling out into my face the next time I have to go into there.

ttfn
Budd

Sealing off Refer vents for Residential Refrigerator


At the beginning of the year, we replaced our defunct Norcold LM1200 12cu ft. RV refrigerator with a standard 22 cu foot Household refrigerator.  It was pretty much a test to see if we could work with it instead of a gas/elec  RV refrigerator so we just used an older extra refrigerator we kept in the basement for summer water melons and beer.
In the past 6 months of use, it has never been a problem for us and even when we have been traveling unplugged for 9 hours at a time the freezer still stayed below 15 degrees.  We are very happy with the household refer and especially with the much larger capacity and far better internal layout and flexibility it has over any RV refer we have seen.
Since this was a test, we left some of the labor to finish off the installation until we were sure we were going to like it and that it would be a completely satisfactory solution, which it is.  One of the things left to do was to seal off the outside venting that was there for the RV refrigerator.  Although I wrapped each vent door in a trash bag and pinned it shut, it looked odd and the winds on the highway shredded them pretty quickly. With them unsealed it has been like living with a window open all the time so before summer gets really hot I needed to finish this off.

The main thing I was concerned about was air infiltration. A secondary concern was just plain insulation which is problematic on the bottom vent because there is only 1” behind the refer and the air being exhausted when the refer is running needs to be able to circulate back into the interior of the RV or the compressor will overheat and it won’t cool very well.
The upper vent door was no problem and I fully insulated it with part of a bat of pink fiberglass insulation glued over the 4 mil plastic film I first glued to the backside of the door to seal out all airflow through it.
I think that this will work fine for the summer.  I may revisit this later, to see just how well it is actually sealed but short of pulling the refrigerator and sealing the hole from inside the RV I don’t see much chance of doing it any better.
ttfn

Rear Window Crud

The runoff from the rear fiberglass end cap and roof have left a really hard deposit on the rear windows.  I have tried a number of things to get it off with mixed success.
The last thing I have used is CLR, and it appears to work better than anything else.  I make it a point to really rinse it well and then follow its use with a rewash with Simple Green before a final cleaning with Invisible Glass.
CLR contains some acids and I don’t want residual problems with anything below the windows from acid residues left to fester.